
Sample Course
What does an orienteering map look like?
Orienteering maps are drawn to a large scale, most commonly 1:10,000 (1 cm=100m.) Wherever you might be in the World the maps use the same colours and symbols to show the terrain. They are prepared specifically for orienteering and, as well as describing what you can see. aim to provide information to help you work out the quickest routes (which may vary from person to person.)t
Although the maps will probably be unfamiliar when you start the sport, there is an underlying logic and you will quickly learn. You will absorb much of the information by attending your first event.
Orienteering maps are drawn using magnetic north rather than grid north, and are printed in five colours on white paper.
Colour is an integral part of the symbol:
- WHITE is used for wooded areas which are easy to run through.
- GREEN is used for thicker wooded areas which are harder to run through – the darker the shade of green, the thicker the forest is.
- YELLOW is used for open areas – a solid yellow for grassy spaces such as playing fields, and a paler yellow for rougher terrain (‘rough open’) such as heather.
- BLACK is used for most man-made features such as buildings, paths and tracks, and also for rocks and cliffs.
- BROWN is used to show landform, including contour lines, gullies, pits and small hills.
- BLUE is used for water features such as lakes, ponds and streams.
We are dependent on goodwill to retain access for orienteering, so please respect crossing points and “access forbidden” on the map. Private areas such as gardens are marked in olive green which is always out-of-bounds, and other areas which are out-of-bounds (perhaps just for this event) have a purple cross-hatch.
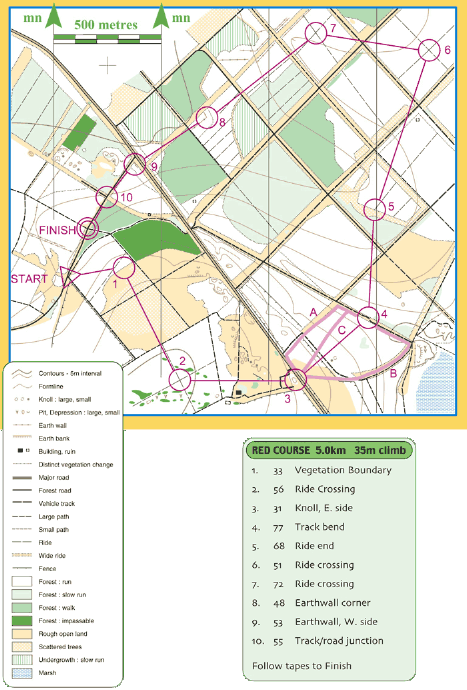
A sample orienteering map (with no “out–of-bounds”) is shown above. It is taken from the British Orienteering website. This includes a typical orienteering course, a key of symbols (bottom left) and a list of descriptions of each of the control points (bottom right) – see below for more explanations of these.
The course on this map is a red colour standard course. (This is a similar technical difficulty to orange courses.) You will see that the Start is marked with a triangle, each of the control points are marked with a circle, and then the Finish point with a double circle. This notation is used for all orienteering courses (although most maps will not include the words “Start” or “Finish”, so remember that the Start is a triangle). You will always be at the Start point when you pick up your map (and this will be marked with an orienteering flag.)
The course above has 10 controls (checkpoints) to visit – note that you must visit them in the correct order, 1-10. The route you take between the controls is up to you.
The control description sheet (see bottom right above) contains details of the control codes and a description of the location of the kite. For example, control number 1 has code 33 and is located at a boundary between some forest and open land. When you find the control with code number 33 you will know you have found control number 1 – “punch” it with your SI card, and move on to number 2.

Choosing a route
(adapted from the British Orienteering website)
Look at controls 3 and 4 on the map extract, where some possible routes have been added in pink. Using the map, say you have now reached control 3 (knoll, eastern side), just before the major road. To make sure, you check the code (31) and punch your SI card to confirm you have been to that control. Now you have to choose how to get to control 4. You could use any route, but the three most obvious are:
A. Go north up the road until you reach a path on your right. Follow this until it passes through a gap in the fence and then continue along a wide ride. When you reach the vehicle track, turn right (south east) and follow it for 150 metres, bringing you to control 4, code 77.
B. This time you go to your right (due east) across the rough open land until you reach the fence bend. Follow the short section of fence until a wide ride is reached at the next bend in the fence. Now follow the ride as it curves around to the left. Upon reaching the vehicle track, go left for 250 metres until you come to control 4.
C. The first two ways involved going around, following tracks and rides, but you could follow a more direct route, using a compass and going straight across the rough open, through the open forest until you reach the rough open, through the open forest until you reach the vehicle track. If you do, it will be best to ‘aim-off’ to the left, so you can know that you need to turn right to control 4. If you go straight for the control but can’t see the control when you reach the track, you won’t know which way to turn. Although slightly longer and a bit slower, aiming-off can save time in the long run.
What do the controls flags look like?
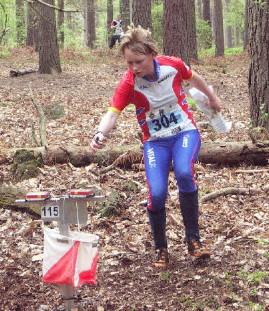
The picture here shows what you are looking for. All orienteering controls look like this, with a red and white marker and control code number so you can check you have found the right control – you can see that this control has code number 115. You “punch” your SI card by inserting it momentarily into the hole of the red box (the box flashes), or the newer “SI Air” cards are contactless (the card makes a noise.)
Finishing
Your time finishes when you punch the Finish control (located at the double-circle). You should then proceed to “download” (usually somewhere under cover), where your SI card is read to confirm you have visited all of the controls in the correct order. You get a print-out of your total time, and “split times” for each control. Note that even if you don’t manage to complete your course, you must always go to the download point, so that the organisers know you are not still out in the forest. They need to know everyone is back safely.
There may be a results display. Almost certainly there will be people to talk to about your run and the course, if you want.
Complete results will usually be published on the organising club’s website later that day. As well as overall results you will be able to see how long every competitor took between each control – by comparing times you can see how you did control by control.